Thursday, March 6, 2014
The Power of the Sun and Rain Against Wood
By [http://ezinearticles.com/?expert=Aigo_Shimonaka]Aigo Shimonaka
We know the power of the elements is astounding, but we may not practically realize just how destructive they can be. The sun, rain, high temperatures, low temperatures, and humidity all play a role in gradually wearing a given material down. Obviously, by keeping an object indoors, you can eliminate the rain and greatly reduce the damaging effects of the others as well.
This is why a structure or DIY project of any kind must be treated accordingly if they are to be permanently exposed outdoors. Wood in particular, depending on type, can be very weak to repeated attacks by the sun and rain. But even before it begins actually rotting and decomposing, it will change shape as it absorbs and desorbs moisture - often considerably.
This change-shape occurs due to a localized expansion or contraction of the wood, manifesting itself in various forms of wood-warping. It follows that if the entire piece would expand or contract in a uniform fashion, the board would only change in dimensions but wouldnt skew or warp. However, this particular scenario will never play out in the real world with boards of any substantial volume or length.
But depending on wood type and the direction of grain, the level of warping can be considerably different. Certain types of wood are simply more resistant to moisture and insects, and quarter-sawn boards - due to the direction of the grain - are more resistant to warping. You put these two qualities together and you get yourself some fairly high-grade boards with which to build outdoors.
An old Table Exhibiting Major Shape-change
Heres a first-hand example of what can happen to a piece of furniture that is left out in the sun and rain with absolutely no regard to its well-being. Granted, the table top isnt a solid piece of wood but a composite of smaller wooden segments, making it significantly weaker to the elements. However, although its time has clearly passed, Im sure there was once a day when this table was a stunning piece of furniture in its own right.
On dry, sunny days, the rel=nofollow [http://freeandhandy.com/handmade-homemade-rustic-dining-table/]table top curls up into the shape of a smile when viewed cross-sectionally. Why? Because the direct sunlight literally sucks the moisture out of the top surface of the table top causing it to contract. This contraction is what pulls the wood into the nice - but impractical - shape of a smile. The opposite occurs on a rainy day. The same top surface will expand, causing it to return to its original flat shape.
If you liked my article please visit my website at [http://freeandhandy.com]Free and Handy for more, thanks!
Article Source: [http://EzineArticles.com/?The-Power-of-the-Sun-and-Rain-Against-Wood&id=6691218] The Power of the Sun and Rain Against Wood
Read More..
We know the power of the elements is astounding, but we may not practically realize just how destructive they can be. The sun, rain, high temperatures, low temperatures, and humidity all play a role in gradually wearing a given material down. Obviously, by keeping an object indoors, you can eliminate the rain and greatly reduce the damaging effects of the others as well.
This is why a structure or DIY project of any kind must be treated accordingly if they are to be permanently exposed outdoors. Wood in particular, depending on type, can be very weak to repeated attacks by the sun and rain. But even before it begins actually rotting and decomposing, it will change shape as it absorbs and desorbs moisture - often considerably.
This change-shape occurs due to a localized expansion or contraction of the wood, manifesting itself in various forms of wood-warping. It follows that if the entire piece would expand or contract in a uniform fashion, the board would only change in dimensions but wouldnt skew or warp. However, this particular scenario will never play out in the real world with boards of any substantial volume or length.
But depending on wood type and the direction of grain, the level of warping can be considerably different. Certain types of wood are simply more resistant to moisture and insects, and quarter-sawn boards - due to the direction of the grain - are more resistant to warping. You put these two qualities together and you get yourself some fairly high-grade boards with which to build outdoors.
An old Table Exhibiting Major Shape-change
Heres a first-hand example of what can happen to a piece of furniture that is left out in the sun and rain with absolutely no regard to its well-being. Granted, the table top isnt a solid piece of wood but a composite of smaller wooden segments, making it significantly weaker to the elements. However, although its time has clearly passed, Im sure there was once a day when this table was a stunning piece of furniture in its own right.
On dry, sunny days, the rel=nofollow [http://freeandhandy.com/handmade-homemade-rustic-dining-table/]table top curls up into the shape of a smile when viewed cross-sectionally. Why? Because the direct sunlight literally sucks the moisture out of the top surface of the table top causing it to contract. This contraction is what pulls the wood into the nice - but impractical - shape of a smile. The opposite occurs on a rainy day. The same top surface will expand, causing it to return to its original flat shape.
If you liked my article please visit my website at [http://freeandhandy.com]Free and Handy for more, thanks!
Article Source: [http://EzineArticles.com/?The-Power-of-the-Sun-and-Rain-Against-Wood&id=6691218] The Power of the Sun and Rain Against Wood
Wednesday, March 5, 2014
Rojana Ibarra Wood Jewelry
Wood Jewelry has been around from the beginning of time and now has been getting a new look with the use of modern technology. Before people only had natural resources such as wood, bone, teeth, leather, and stones to create jewelry. While now we have much more tools and technologies to create these wearable natural works of art. Once thought as tribal and native, wood jewelry is now seen as more contemporary and chic. This semester in my intro to metalsmithing class we worked on creating mostly jewelry, this got me thinking and I thought what about wood jewelry and and combining the two. So I started to look up wood jewelry and fell in love with some of these creative designers.
Anthony Roussel creates beautifully intricate jewelry that are works of art. Roussel bonds thin layers of wood such as birch, sycamore, ash, maple and walnut and then uses the latest technology in designing his jewelry. He works with 3D software, CNC routing and milling machines, laser cutting and or etching, and water jet cutting methods. He uses digital software to create his designs then laser cuts them to seal the edges. He then finishes them using eco friendly milk based paint.
Bangle Bracelets

Rings
Gustav Reyes has very sleek and contemporary designs such as this necklace titled: Tie Me Not Neckpiece.

Reyes makes this necklace out of either 3-4 different types of woods: walnut, maple, cherry and/or rockelm. Each piece of this necklace is hand formed using a cold bend process, and finished with natural beeswax. The cold bend process is where a piece of wood is put in water before it is put into a mold and bended to the desired shape. He also is using salvaged wood in his pieces, which is inspiring and eco-friendly. He uses wood from old instruments such as bass violins and xylophones to other things like baseball bats. He re-purposes salvaged wood from one form and function and transforms it into a new shape and function.


Good Wood NYC is a company started in 2007 that uses techniques such as engraving, hand sanding, and painting to create fashionable jewelry and accessories out of wood.


In researching I also found out about many different techniques there are in creating wood jewelry from carving, lathing, and even mixing it with different materials such as precious metals and stones. The plus side is if using salvaged wood or remnant pieces you are being more ecofriendly and helping the environment. The possibilities of materials are endless and I hope to start experimenting myself on creating some of my own unique wearable works of art.
Plywood and bathroom project
This was a really busy weekend. My little bathroom project turned out pretty nice. It gave me an opportunity to use some of that curly redwood. Wow, that is some gorgeous wood.

The project can easily be made in a couple hours, but I spent two days shooting the video. Lots of editing to do now.
Its a book nook/book shelf/toilet paper holder. I actually started out to make a magazine rack, but then realized we dont really read magazines any more, and Im sure very few house guests are the least bit interested in Wood Magazine. Look for the video on Friday. Itll be, well, different.
****
Mere Minutes
A little bit on plywood. A question, and a tool I like to use to rip plywood.
Read More..
The project can easily be made in a couple hours, but I spent two days shooting the video. Lots of editing to do now.
Its a book nook/book shelf/toilet paper holder. I actually started out to make a magazine rack, but then realized we dont really read magazines any more, and Im sure very few house guests are the least bit interested in Wood Magazine. Look for the video on Friday. Itll be, well, different.
****
Mere Minutes
A little bit on plywood. A question, and a tool I like to use to rip plywood.
Tuesday, March 4, 2014
Lathe woodworking

 like the one shown below. To create these design, you must first set up a squared piece of wood and find the center of both ends of the piece of wood. after the center is found, you have to mark your wood and tightly screw your piece of wood in place. After this process, you must then mark your wood in which you would like to shave off. after your wood is in place, you must now attain the tools necessary to obtain the shape that is wanted.
Before beginning to carve, one must first know the f
 undamental of the machine. The image below displays the tools necessary for the design of the piece of wood. Each tool has its purpose for shape and structure of the piece that is being created. the small tool to the right that is curved is used to obtain a smooth curve within the piece. the one next to that is used to begin the detail of your piece, to get into the small areas for perfection. they tool in the middle has a sharp tip, and this is used to get an angle on your work of art. it is where you obtain the specific parts that are separated in sections as shown in the table leg above. the next tool is used for the bases or beginning of the sculpture. the last tool to the right is the main tool that is used for the shaping of every design. after this tool is used, the other tools accent this one as the other smaller tools are used for more detail.
The easy part about using the lathe machine is its ease. After one has created a design, sanding is done on the machine. sanding is fairly easy because the piece is spinning and all one has to do is place a piece of sand paper on the piece. after you sand your project to perfection, the next step is to wax your piece unless it is going to be stained first.

 This machine is used to make baseball bats where the baseball bats are waxed and buffed on the machine to give it its shiny finish. I personally love using this machine because its pretty simple to use if one is skills enough to do so. the hard part is creating a design on paper and creating that design to real life.
T Chisels Salem Secretary
This piece is sick! The detail is amazing and if you watch his videos you will see the pains taking time and effort he puts into it. This is definitely something I would strive towards, but I am WAY off right now. In the words of the Chisel "whos better than me?!" Love it!
Wood be expensive
I finally decided upon walnut for my mini-chair project. And now I must officially follow through on it: I turned in my fair entry form this afternoon, along with the $5.00 entry fee. I think Ill see if I can add some faux splines along each of the bends. Thought about fingerjoints but quickly talked myself out of that madness.
Heres what a $34 chunk of walnut looks like:

Wow. Thats why I use scrap wood whenever I can and save all sorts of cut-offs. Im not sure what the going rate is for walnut, but this is a 4 x 1" x 6" board. Does that seem high? I had a fleeting thought about some really exotic wood, but came to my senses at the prices for purpleheart, wenge, and others. Thankfully, my lumberyard will sell you wood at any length you want.
Ah well. Im certain I can squeeze several projects out of this. First, Ill resaw it in two. Kind of like getting twice as much wood!
Ill keep you updated on the progress. I want to get this done this weekend.
Monday, March 3, 2014
How To Apply A Shellac Oil Or Lacquer Finish
By [http://ezinearticles.com/?expert=Kenneth_J_Ellis]Kenneth J Ellis
SHELLAC FINISH
Shellac is made from the secretion of the lac insect. Proper thinning of the shellac is a vital part of the correct application. The concentration of shellac in alcohol is known as its cut. Most shellac on the market is 4 or 5 pound cut. The cut is indicated on the label. For almost all purposes, shellac will require thinning with alcohol. The proportions are the same if you are thinning a pint or a gallon. For example: "If you wished to thin a pint of 4-pound cut to a 2-pound cut, you would use 3/4 pint of alcohol to 1 pint of shellac". A 4-pound cut is the best for general use. When thinning, use only pure denatured ethyl or grain alcohol. Before you use shellac, shake or stir it thoroughly. The first two coats should be thinned to a 2 pound cut and the final coat should be 4 pound cut. Shellac comes in three types: orange, bleached or white and dewaxed. White is best for most work and orange is used for dark wood or darkly stained woods.
SATIN RUBBED FINISH
This finish is ideal for most furniture. Here are some pointers for applying shellac to obtain a satin rubbed finish:
1. Apply enough coats of shellac so the last one shines. (four or more) Allow time for each coat to dry. Test for drying by trying to make a thumb print.
2. Sand lightly with #400 grit paper. Dust with a brush and wipe with a cloth after each coat.
3.Allow several hours for the final coat to dry completely, then rub with 3/0 steel wool until there is absolutely no shine remaining. After the gloss has been removed by rubbing with steel wool, sprinkle the surface with dry 2/0 pumice and brush lightly. Dust and wipe off the surface and apply at least two coats of wax.
POLISHED RUBBED FINISH
This finish is for high grade furniture that requires extreme smoothness and high polish. Surfaces should be completely smoothed with paste filler before the finish is applied. The steps are similer to the satin rubbed finish but usually six or more coats should be applied. When the entire surface has been completed, wipe it off with soft rags and allow to dry completely. When a highly polished finish is desired, it may be obtained by a final rubbing with rottenstone and a linseed oil mixture after the surface has been completely cleaned. Then apply at least two coats of wax.
OIL FINISH
An oil finish is one of the oldest for hard or close grained woods. The old-fashioned oil finish is accomplished by using a mixture of two-thirds boiled linseed oil and one-third pure turpentine. It requires from five to twenty coats. The process should be repeated until no dull spots remain. Allow at least two days between the first two coats and from a week to a month between later coats. Each coat must be dried before another coat is applied. Because of the time involved, most do-it-yourselfers would rather use the following method:
First coat: Apply one-third raw linseed oil and two-thirds turpentine. Allow 24 hours to dry.
Second coat: Apply pure boiled linseed oil. Dry for 24 hours.
Third coat: Same as second coat.
Fourth coat: Mix and apply on half boiled linseed oil and one half japan drier. While applying, watch for tackiness and rub off with burlap. Complete the finish by rubbing with pumice and oil, then with 3/0 steel wool as described earlier.
LACQUER FINISH
Lacquer has replaced varnish ans shellac as finishes in the furniture making field because it is easy to spray and dries quickly for fast production. For the home handyman, the lacquer system isnt widely used because spray equipment is necessary. If your shop is equipped with an air compressor and a spray gun, its fairly easy to learn. Lacquer offers a hard, durable, waterproof surface that will withstand high heat without becoming sticky. The surface is transparent and brings out the beauty of the wood grain when a natural finish is desired. Lacquer is the fastest drying finish ever developed. The drying time is 1 1/2 to 2 hours as compared to quick-dry paints, varnishes, and enamels, which require at least 4 hours.
Spraying Technique: The best spraying method requires a pressure of 30 to 40 pounds. As a general rule, using a spray gun at this pressure, you can get by with a single coat. Before beginning the spraying job, be sure the equipment is clean, and make sure it works properly by trying a test pattern on waste material. Apply the spray in even lines across the surface moving parallel with the work. Handling a paint sprayer is an art that comes with practice. Soon youll be spraying like a pro.
Article Source: [http://EzineArticles.com/?How-To-Apply-A-Shellac,-Oil,-Or-Lacquer-Finish&id=6762925] How To Apply A Shellac, Oil, Or Lacquer Finish
Read More..
SHELLAC FINISH
Shellac is made from the secretion of the lac insect. Proper thinning of the shellac is a vital part of the correct application. The concentration of shellac in alcohol is known as its cut. Most shellac on the market is 4 or 5 pound cut. The cut is indicated on the label. For almost all purposes, shellac will require thinning with alcohol. The proportions are the same if you are thinning a pint or a gallon. For example: "If you wished to thin a pint of 4-pound cut to a 2-pound cut, you would use 3/4 pint of alcohol to 1 pint of shellac". A 4-pound cut is the best for general use. When thinning, use only pure denatured ethyl or grain alcohol. Before you use shellac, shake or stir it thoroughly. The first two coats should be thinned to a 2 pound cut and the final coat should be 4 pound cut. Shellac comes in three types: orange, bleached or white and dewaxed. White is best for most work and orange is used for dark wood or darkly stained woods.
SATIN RUBBED FINISH
This finish is ideal for most furniture. Here are some pointers for applying shellac to obtain a satin rubbed finish:
1. Apply enough coats of shellac so the last one shines. (four or more) Allow time for each coat to dry. Test for drying by trying to make a thumb print.
2. Sand lightly with #400 grit paper. Dust with a brush and wipe with a cloth after each coat.
3.Allow several hours for the final coat to dry completely, then rub with 3/0 steel wool until there is absolutely no shine remaining. After the gloss has been removed by rubbing with steel wool, sprinkle the surface with dry 2/0 pumice and brush lightly. Dust and wipe off the surface and apply at least two coats of wax.
POLISHED RUBBED FINISH
This finish is for high grade furniture that requires extreme smoothness and high polish. Surfaces should be completely smoothed with paste filler before the finish is applied. The steps are similer to the satin rubbed finish but usually six or more coats should be applied. When the entire surface has been completed, wipe it off with soft rags and allow to dry completely. When a highly polished finish is desired, it may be obtained by a final rubbing with rottenstone and a linseed oil mixture after the surface has been completely cleaned. Then apply at least two coats of wax.
OIL FINISH
An oil finish is one of the oldest for hard or close grained woods. The old-fashioned oil finish is accomplished by using a mixture of two-thirds boiled linseed oil and one-third pure turpentine. It requires from five to twenty coats. The process should be repeated until no dull spots remain. Allow at least two days between the first two coats and from a week to a month between later coats. Each coat must be dried before another coat is applied. Because of the time involved, most do-it-yourselfers would rather use the following method:
First coat: Apply one-third raw linseed oil and two-thirds turpentine. Allow 24 hours to dry.
Second coat: Apply pure boiled linseed oil. Dry for 24 hours.
Third coat: Same as second coat.
Fourth coat: Mix and apply on half boiled linseed oil and one half japan drier. While applying, watch for tackiness and rub off with burlap. Complete the finish by rubbing with pumice and oil, then with 3/0 steel wool as described earlier.
LACQUER FINISH
Lacquer has replaced varnish ans shellac as finishes in the furniture making field because it is easy to spray and dries quickly for fast production. For the home handyman, the lacquer system isnt widely used because spray equipment is necessary. If your shop is equipped with an air compressor and a spray gun, its fairly easy to learn. Lacquer offers a hard, durable, waterproof surface that will withstand high heat without becoming sticky. The surface is transparent and brings out the beauty of the wood grain when a natural finish is desired. Lacquer is the fastest drying finish ever developed. The drying time is 1 1/2 to 2 hours as compared to quick-dry paints, varnishes, and enamels, which require at least 4 hours.
Spraying Technique: The best spraying method requires a pressure of 30 to 40 pounds. As a general rule, using a spray gun at this pressure, you can get by with a single coat. Before beginning the spraying job, be sure the equipment is clean, and make sure it works properly by trying a test pattern on waste material. Apply the spray in even lines across the surface moving parallel with the work. Handling a paint sprayer is an art that comes with practice. Soon youll be spraying like a pro.
Article Source: [http://EzineArticles.com/?How-To-Apply-A-Shellac,-Oil,-Or-Lacquer-Finish&id=6762925] How To Apply A Shellac, Oil, Or Lacquer Finish
On my workbench finishing cart
 I am building a shop project for this weeks show. It a roll-around finishing cart with shelves on two sides. I have some leftover melamine from my router table that Ill use for the top.
As of this evening, Ive got most of it done. Most time consuming part was cutting out all the grooves for the dividers and shelves. That, and breaking down the 4x8 plywood sheet.
I hope it will be a useful way for me to store my finishing supplies, paints and brushes. Ill be able to wheel it right to my workbench or wherever needed. Since it will be stored next to my utility sink, liquids and splashes on the melamine top should wipe off easily.
Stop by Friday for the video and free plans!


Sunday, March 2, 2014
The Veggie Garden
Hey there! Hope everyone is enjoying their day. I thought I would share some photos of our backyard garden with you as that is where we are spending most of our time these days since its SUMMER! Yay!

Gardening is a huge passion of mine. Our kids have even been bitten by the gardening bug. Hubby and I have had a vegetable garden since we first married 20 years ago, no matter where we live.

We kinda follow the square foot gardening plan in that we built 4 x 4 boxes for our vegetables. Thats about it. I dont really plant something per square foot. This works for us. As you can see, we finally finished the privacy fence and oh how we love it. We still have some landscaping to do in the back corner where our compost bin is. All the veggies are coming along nicely, which is a far cry from last summer when everything completely burned up with the hotter than hades summer.

The heirloom tomatoes blooms are setting and I cant wait to eat them. It feels like forever since we have enjoyed tomatoes right out of the garden.

We also planted lots of cherry and yellow pear tomatoes to throw in our salads and pasta. Or add to the basil with fresh mozzarella. Yum!

The zucchini. I have to admit I have a love hate relationship with zucchini. While I love to eat them, I cant seem to grow them very well, even though they are supposed to be fool proof. Anyone else have this problem? Mine shrivel up, turn yellow and die before they ever get big enough to harvest. I read this is because of inadequate pollination. So, I did try the hand pollinating method of taking the male and female flower and..........(ahem) nevermind. Um, have you ever seen what the inside of male zucchini flowers looks like? I have to admit, I may or may not have turned bright red while doing it. It worked last year, but I dont get up early enough when the flowers are open in the morning to do that with each one. So, I might be buying all our zucchini at our local farmers market.

The arugula is growing like weeds. Love that stuff.

And we cant wait for these little flowers to turn into delicious cantaloupe, my boys favorite. Im telling ya, you cant even compare the taste of a garden cantaloupe vs. a store bought.
So sweet and juicy.
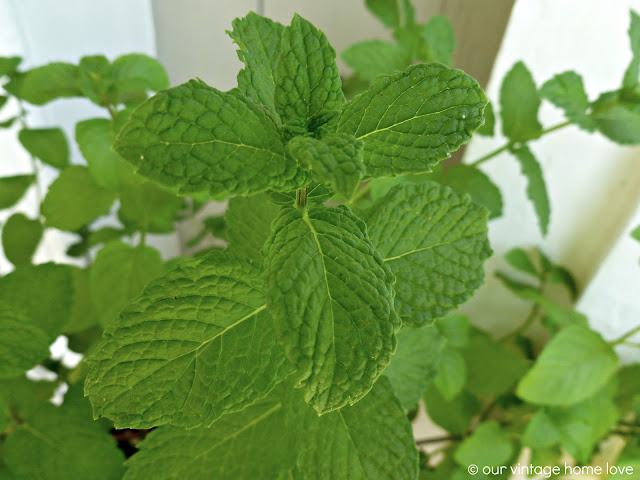
Plenty of mint. I like to add sprigs to simple syrup and steep, then remove and toss with fresh fruit. So good.

And all the other herbs are doing quite nicely.

As are the red geraniums. Theres nothing quite as cheerful as a bright red geranium.
We also have planted cucumbers, banana peppers and red bell peppers. All of our plants I started indoors by seed during the winter under grow lights.
So much cheaper, though kinda a lot of work, too.
I just love summer vegetable gardening and highly recommend it,
even if you have to grown your veggies in pots.
Enjoy the rest of your day!
How To Make Homemade Ravioli

Making homemade pasta seems like a daunting task and it was to me too, but it was one of those things I wanted to learn to do. My youngest has serious food allergies and after a couple of very scary moments when he was a baby, it became clear that making homemade food was best for him. This ravioli is his favorite.
And let me tell ya, making ravioli from scratch is a heck of a lot easier, and faster, if you have one of these gadgets.

To get started with your pasta dough, grab these ingredients. I doubled my recipe here, however, the recipe listed below is NOT doubled.


Homemade Ravioli with 4 Cheese Filling
Pasta Dough
3/4 cup plus 2 TBS all purpose flour
3/4 cup plus 2 TBS cake flour
2 eggs
2 TBS olive oil
4 Cheese Filling
8 oz. ricotta cheese
4 oz. cream cheese
1/2 cup shredded mozzarella
1/2 cup sharp provolone
1 egg
To make pasta dough, combine flours, make a well in large bowl and crack both eggs into along with olive oil. Whisk, slowly incorporating flour until your dough comes together. If its too dry, add very small amounts of water at a time. Form into a ball, wrap in plastic wrap and let rest at room temp. for approximately 30 minutes.
Prepare cheese filling by combining filling ingredients in a bowl. Set aside.
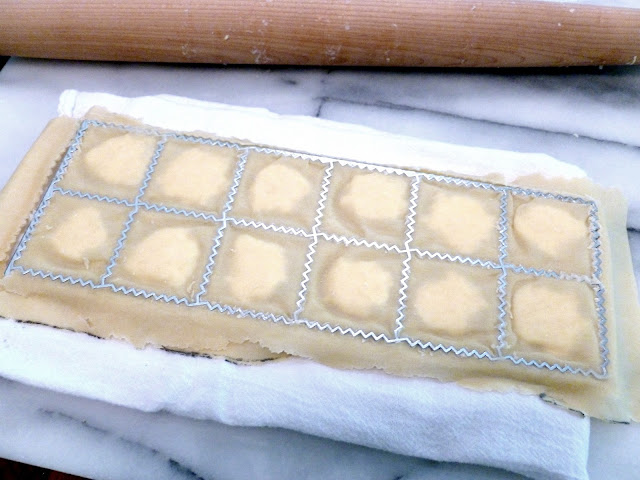
After dough has rested, cut the dough into four portions. Working with one portion at a time, flatten the dough into a disk and send through a pasta machine on the lowest setting. Roll through each setting up to setting 7.
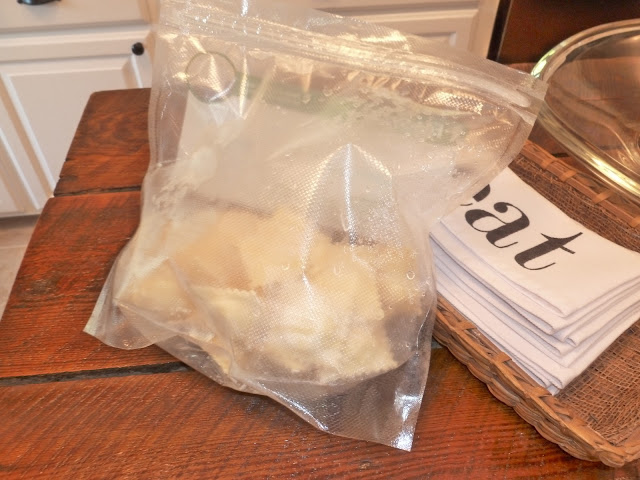
Place dough across ravioli press and using the top portion of the press, press it into your dough to create indentations in your pasta for your filling. Fill with about a half a tablespoon of your filling and cover with another sheet of pasta dough. Take a rolling pin and roll across the dough to seal and cut the ravioli. Turn onto a floured cookie sheet and repeat entire process with remaining dough. After all ravioli are made, you can freeze them individually on the cookie sheet and then when completely frozen, transfer to a freezer bag, or cook immediately in salted boiling water. Ravioli are done when they float to the top.
Im working on a thrift chair redo that I cant wait to show you! Im so excited about it! And Ive got another great giveaway next week so stay tuned! And have a great day everyone!
Subscribe to:
Comments (Atom)