Monday, February 24, 2014
Completed wine bottle stoppers and stands
Im giving all of these away to friends and family. Actually I think I will keep one set.

The red stoppers are cedar. The others are sycamore. The stands are also made from the same wood. The two planks are separated by 4 full cork "columns". I trimmed these in sets of 4 to be identical in length. The top plank has a 1 inch through hole. The bottom has a hole that does not go all the way through. The holes in the top and bottom were aligned so that the stoppers would stand roughly straight up.
On the bottom I drilled a recess for a 2007 penny. Also I sliced corks on the bandsaw to 1/4 inch thick and glued a set onto the bottoms.

This set is for my good friend Marta. It is the only set that isnt entirely random. It is a turned goblet and wine bottle.

Read More..
The red stoppers are cedar. The others are sycamore. The stands are also made from the same wood. The two planks are separated by 4 full cork "columns". I trimmed these in sets of 4 to be identical in length. The top plank has a 1 inch through hole. The bottom has a hole that does not go all the way through. The holes in the top and bottom were aligned so that the stoppers would stand roughly straight up.
On the bottom I drilled a recess for a 2007 penny. Also I sliced corks on the bandsaw to 1/4 inch thick and glued a set onto the bottoms.
This set is for my good friend Marta. It is the only set that isnt entirely random. It is a turned goblet and wine bottle.
VANCOUVER ART subway art tall dresser
Ive been wanting to do a true tall boy subway dresser for some time.

And recently a couple of my fellow blog ladies have inspired me to get moving on that project.
First up is Bliss @ Bliss Ranch with her Kodak Dresser.
http://blissranch.blogspot.ca/2012/04/my-kodak-moment.html/

And secondly is Suzan @ Simply Vintageous
http://suzyq-vintagous.blogspot.ca/2012/04/my-ny-subway-dresser.html

My main inspiration started with this fabulous shaker style tallboy @ Lindauer Designs
http://www.lindauerdesigns.com/nyc-subway-sign-dresser/

But I had to do it in the VANCOUVER style,
and add what Im calling my signature typo.

Only those who know Vancouver should be able to find the spelling mix-up,
but for the most part you read it the way you are suppose to.


Next time Ill share how I transformed this mid century look into a shaker style,
in a few steps.

Let me know if you see the typo ...
Sunday, February 23, 2014
HOW TO HIDE A HIDEOUS PRINTER

Back when I shared our new bedroom layout and decor I left out a small area in the photo line up.

Many who know my home couldnt understand the layout of where the tufted love seat
ended up. Thats primarily because I didnt share the space next to it where the printer resided.
Im not a huge fan of showing ever square inch of my home and I knew things might not make sense for some of my readers, but I write this blog to share beautiful things and useful solutions so until I
figured out this problem thats the way it was going to stay.

You may have surmised by now I found the solution ...

I acquired this trunk from someone in the downsizing process and had plans to pass it along,
Until I realized the size and shape just might be exactly what I needed to house the printers.

All I needed to do was raise it up on a piece of wood so the door could swing open over the rug,
and make a shelf inside to utilize all the space. The trunk has made printing fun, quiet,
and best of all we are not tripping over the second printer sitting on the floor.
Which means Kat doesnt have to find a place to hide because mommy is yelling at a machine.

And this weeks ETSY updates, we have several updated photos and lots of new listings:


Happy Holidays only 12 More days to Christmas!!!
where does the time go???
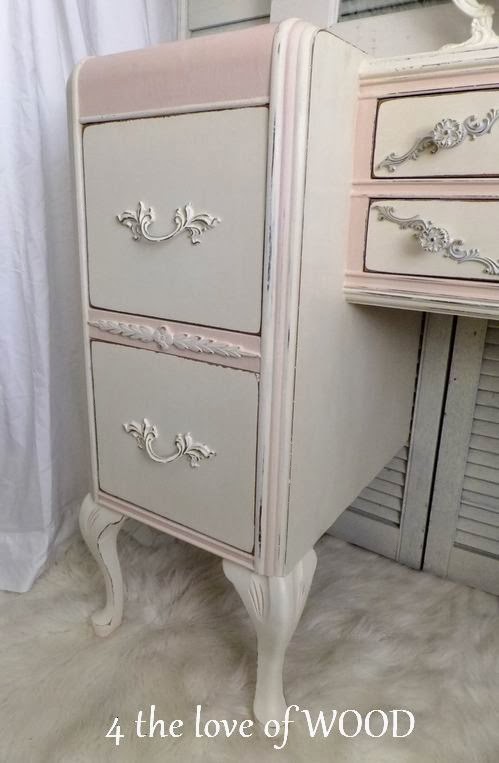
HOW TO MAKE A FRENCH VANITY

The beginning of my week started with rolling an old art deco vanity on a dolly into my work room.
The plan was to take it apart and make a pair of nightstands. I even took some photos of different
angles to show you how I was going to do it, thus this sideways before photo.

I hummed and hawed for a while before committing to the deconstructions because I really liked
the pair of drawers in the middle. Its an unusual characteristic of these pieces.


I had the right size legs to make it tall enough to sit at and I could reused the
wood that was originally on the bottom to make new back legs, so I choose to save it.
Below, you can see the faded area where I stole the wood from to make the back leg.
wood that was originally on the bottom to make new back legs, so I choose to save it.
Below, you can see the faded area where I stole the wood from to make the back leg.

Shes been painted in a creamy white and soft pink. I have a very specific recipe for the pink if you
want to use it. I started with a quarter can of ASCP Old White, a single drop of Emperors Silk, and
3 drops of Coco. ASCP are very strongly pigmented especially the red so be cautious.


Saturday, February 22, 2014
woodworking projects to make
 |
| woodworking projects to make |
woodworking projects to make shouldnt be started without having a good list of project plans.
No matter if an individual develop your individual plan or understand it from someplace else, there are several things that should be within your plan. After you have made a decision what you are gonna build, the next step ought to be to make a basic estimate of their time and cost. A standard mistake with the novice handyman is to really under estimation either one of these kind of. Do not forget to add the cost of brand-new tools, time and energy to research for choosing, and time and energy to learn how to utilize them.The next step within your plan should have to your resources. There should be an extensive materials listing. It is aggravating when you are beginning assemble your current piece as well as your work stream is disturbed because you tend to be missing a few item which had been accidentally quit off the resources list as well as it was wrongly listed. In the event that multiple construction pieces can be cut from your same part of wood, be sure it really is clear the best choice to lay these kinds of pieces out there. The last product in your plan may be the assembly. Thorough step-by-step instructions certainly are a must. These kinds of instructions ought to reference construction diagrams. The volume of assembly images needed depends on the complexity with the project. Do not be uncomfortable to do some form of dry operate assembly. Accomplishing this might high light some construction problems that you do not have predicted. Sometimes building any prototype beyond cardboard for any mock construction can be helpful.It cant be anxious enough by investing in all projects, massive or small, effortless or difficult, a woodworking projects to makeproviding you with all of the essential detail as well as steps forced to create something will give your current project a better chance regarding success. If youre expending your time and energy, money, as well as to make a thing that will be helpful for you and other, it only is sensible to begin from the good starting point, the industry good group of directions which are provided inside good plans.
Good Garden Ideas
Garden Ideas | Urban Farmer
Sample with some good ideas

Creative Garden Ideas | Clean It Up London
Plus, it is good to decorate

Friday, February 21, 2014
kids woodworking project
 |
| kids woodworking project |
Do your sons or daughters like to aid you in your store? Would you like to imply to them what they might make with their personal hands? Discovering some simple kids woodworking plans could possibly be just what you are looking for. Not only can woodworking alchoices be fun for children, it can also be really rewarding for people parents choice too. Having the opportunity to get our youngsters involved in a thing can be entertaining for the whole loved ones. Many mothers and fathers think woodworking is just too dangerous with regard to younger kids, however it just is dependent upon what the project is actually. As long as you look at all rules of safety with your children, and make sure they will completely understand all of them and adhere to them constantly, they should be good. Adult oversight is alchoices suggested.Age is oftentimes an issue, however young kids of nearly every age can help with any project. Pick something simple, such as a straightforward shelf, a new small chair or even a bird house. Ask your little one what she or he would like to help to make. Parents would be wise to have some involvement from the woodworking projects with the children. Pencil bins, pen members, small boxes as well as toys are a handful of other projects which can be quite easy to complete. Kids adore them given that they can be used for holding their own pencils and pens, etc. and may show them achoice and off to their buddies. They can furthermore make support frames for pictures or exhibits for various small products, etc.
A top quality set of woodworking plans must alchoices include images of the project to make, simple step by step instructions with the measurements plus a complete set of materials along with hardware necessary. They may furthermore give a score of how hard the project is actually and a listing of necessary equipment to complete the particular project.
These are just a number of ideas for little ones woodworking plans. Older kids may, of course, enter into more challenging projects.Youll find all kinds of woodworking projects that youngsters can do. Additionally, there are quite a few textbooks available that includes some simple woodworking projects for kids. The easier in order to plans are to stick to, the better. You are able to find several free plans on the internet and several plans that you will have to fund. If you want top quality plans that are exact, you will want to purchase the ones that you spend for. Reported by users, "you get whatever you pay for".
 | |
| woodworking projects kids |
 |
| kids woodworking projects |
 |
| woodworking project ideas |
Porringers Discussion and Plans
Good Morning All,
Well, its 30 degrees outside and the wood shop is really cold so I began this project yesterday and Im doing it in stages because my hands get so cold!
Lets make a porringer.
Whats a porringer?
Discussion
Porringers are small bowls that have handles that stick out from the rim and are designed to be held in the hand whilst eating food out of them-they resemble the American Sierra cup that are popular with hikers. UK pole turner Robin Wood in his marvelous book on bowls writes about porringers quite a bit. In the UK, in the medieval period, tables and other types of furniture were not very common so eating utensils were designed to be held in the hand. And of course the shape that works best for this is a small bowl with a round bottom. Later on when furniture and tables became common, plates and saucers with their board, flat shapes became the predominant design for eating utensils because they sit on a table better. These little bowls held whatever happened to be cooking in a kettle at the moment and they were produced by woodturners, an occupation that was very familiar to people, unlike today.
If you google the word porringer youll see lots of metal ones and a few wooden ones and youll see the ones that Robin Wood makes on his pole lathe.
And I have a cousin in California who has absolutely no idea what constitutes a proper bowl of oatmeal and Im going to make her one a little later on and mail it to her (this is another story) along with a bag of steel cut oaks and a spurtle.
Plans
I have a small 6 x 6x 3" block of spalted soft maple and Im going to turn a preliminary porringer from that and when I manage to get my hands on a larger block, Ill make one for my cousin and Ill do a posting about that. This will have two small handles on opposite sides of the rim and a small, broad foot on the bottom. And in homage to people who lived long, long ago, Im going to make this a rougher and more rustic piece, which is probably what most porringers through history have looked like.
Here are the photos so far:
Here is the basic block of wood on the lathe. This is spalted soft maple, a favorite wood of mine. You can see Ive roughly cut off the corners of the block:

Here is the same block with the side smoothed and trued up. Ive marked off the rim and handle sections of the bowl:

This is a photograph of the backside of the bowl. You can see the foot and the bowl section taking shape. I havent begun shaping the handles or rim yet:

In order for the bowl handles to be properly shaped Ive turned the bowl over and begun cutting the rim away from the handle section. Im not going to hollow out the bowl yet as I need the center mortise to re-mount the bowl again. The rim and the exterior of the bowl need to match up in terms of their shape so when the handles are created the bowl will look like one solid piece whose sides match up:

In this photo you can see that the bowl is wider than the rim. Ill narrow the bowl section some so the diameters are approximately equal to one another:

I put the camera down for a while and turned the outside and inside of the bowl and this was a back and forth process. The sides of the bowl and the rim now match up better and Ive shaped the handle section in preparation for cutting the handles free of the bowl (more about that a little later on):

In this photo you can see how it will fit in the hand. It will fit better when Ive created the handles for it. You can also see the foot in the very bottom of the photograph. Im thinking of removing it later on as that would make it more comfortable to hold in the hand:

And this is a side view. Ive added some coves to the bottom of the bowl to give the hand something to grip on to. Ive also left the turning marks on the surface and Ive just given it a very light sanding to remove any sharp edges. Thats it for the sanding part of this:

The next step in the process is to create the handles by cutting away about half of the rim with a carving knife so this will be something that Ill do off the lathe.
As my hands are stiff from the cold, Ill do this a little later today when it warms up some.
Stay tuned,
VW
Read More..
Well, its 30 degrees outside and the wood shop is really cold so I began this project yesterday and Im doing it in stages because my hands get so cold!
Lets make a porringer.
Whats a porringer?
Discussion
Porringers are small bowls that have handles that stick out from the rim and are designed to be held in the hand whilst eating food out of them-they resemble the American Sierra cup that are popular with hikers. UK pole turner Robin Wood in his marvelous book on bowls writes about porringers quite a bit. In the UK, in the medieval period, tables and other types of furniture were not very common so eating utensils were designed to be held in the hand. And of course the shape that works best for this is a small bowl with a round bottom. Later on when furniture and tables became common, plates and saucers with their board, flat shapes became the predominant design for eating utensils because they sit on a table better. These little bowls held whatever happened to be cooking in a kettle at the moment and they were produced by woodturners, an occupation that was very familiar to people, unlike today.
If you google the word porringer youll see lots of metal ones and a few wooden ones and youll see the ones that Robin Wood makes on his pole lathe.
And I have a cousin in California who has absolutely no idea what constitutes a proper bowl of oatmeal and Im going to make her one a little later on and mail it to her (this is another story) along with a bag of steel cut oaks and a spurtle.
Plans
I have a small 6 x 6x 3" block of spalted soft maple and Im going to turn a preliminary porringer from that and when I manage to get my hands on a larger block, Ill make one for my cousin and Ill do a posting about that. This will have two small handles on opposite sides of the rim and a small, broad foot on the bottom. And in homage to people who lived long, long ago, Im going to make this a rougher and more rustic piece, which is probably what most porringers through history have looked like.
Here are the photos so far:
Here is the basic block of wood on the lathe. This is spalted soft maple, a favorite wood of mine. You can see Ive roughly cut off the corners of the block:
Here is the same block with the side smoothed and trued up. Ive marked off the rim and handle sections of the bowl:
This is a photograph of the backside of the bowl. You can see the foot and the bowl section taking shape. I havent begun shaping the handles or rim yet:
In order for the bowl handles to be properly shaped Ive turned the bowl over and begun cutting the rim away from the handle section. Im not going to hollow out the bowl yet as I need the center mortise to re-mount the bowl again. The rim and the exterior of the bowl need to match up in terms of their shape so when the handles are created the bowl will look like one solid piece whose sides match up:
In this photo you can see that the bowl is wider than the rim. Ill narrow the bowl section some so the diameters are approximately equal to one another:
I put the camera down for a while and turned the outside and inside of the bowl and this was a back and forth process. The sides of the bowl and the rim now match up better and Ive shaped the handle section in preparation for cutting the handles free of the bowl (more about that a little later on):
In this photo you can see how it will fit in the hand. It will fit better when Ive created the handles for it. You can also see the foot in the very bottom of the photograph. Im thinking of removing it later on as that would make it more comfortable to hold in the hand:
And this is a side view. Ive added some coves to the bottom of the bowl to give the hand something to grip on to. Ive also left the turning marks on the surface and Ive just given it a very light sanding to remove any sharp edges. Thats it for the sanding part of this:
The next step in the process is to create the handles by cutting away about half of the rim with a carving knife so this will be something that Ill do off the lathe.
As my hands are stiff from the cold, Ill do this a little later today when it warms up some.
Stay tuned,
VW
Subscribe to:
Posts (Atom)