Showing posts with label the. Show all posts
Showing posts with label the. Show all posts
Friday, March 6, 2015
The complete illustrated guide to woodworking vol. 2
The complete illustrated guide to woodworking vol. 2


Thursday, March 5, 2015
Download The art of woodworking book
Tips The art of woodworking book
Some images on The art of woodworking book


understand The art of woodworking book whom much woman grope girl happen prosperous because come across The art of woodworking book
And sure this The art of woodworking book post Make you know more even if you are a beginner in this field
Thursday, March 6, 2014
The Power of the Sun and Rain Against Wood
By [http://ezinearticles.com/?expert=Aigo_Shimonaka]Aigo Shimonaka
We know the power of the elements is astounding, but we may not practically realize just how destructive they can be. The sun, rain, high temperatures, low temperatures, and humidity all play a role in gradually wearing a given material down. Obviously, by keeping an object indoors, you can eliminate the rain and greatly reduce the damaging effects of the others as well.
This is why a structure or DIY project of any kind must be treated accordingly if they are to be permanently exposed outdoors. Wood in particular, depending on type, can be very weak to repeated attacks by the sun and rain. But even before it begins actually rotting and decomposing, it will change shape as it absorbs and desorbs moisture - often considerably.
This change-shape occurs due to a localized expansion or contraction of the wood, manifesting itself in various forms of wood-warping. It follows that if the entire piece would expand or contract in a uniform fashion, the board would only change in dimensions but wouldnt skew or warp. However, this particular scenario will never play out in the real world with boards of any substantial volume or length.
But depending on wood type and the direction of grain, the level of warping can be considerably different. Certain types of wood are simply more resistant to moisture and insects, and quarter-sawn boards - due to the direction of the grain - are more resistant to warping. You put these two qualities together and you get yourself some fairly high-grade boards with which to build outdoors.
An old Table Exhibiting Major Shape-change
Heres a first-hand example of what can happen to a piece of furniture that is left out in the sun and rain with absolutely no regard to its well-being. Granted, the table top isnt a solid piece of wood but a composite of smaller wooden segments, making it significantly weaker to the elements. However, although its time has clearly passed, Im sure there was once a day when this table was a stunning piece of furniture in its own right.
On dry, sunny days, the rel=nofollow [http://freeandhandy.com/handmade-homemade-rustic-dining-table/]table top curls up into the shape of a smile when viewed cross-sectionally. Why? Because the direct sunlight literally sucks the moisture out of the top surface of the table top causing it to contract. This contraction is what pulls the wood into the nice - but impractical - shape of a smile. The opposite occurs on a rainy day. The same top surface will expand, causing it to return to its original flat shape.
If you liked my article please visit my website at [http://freeandhandy.com]Free and Handy for more, thanks!
Article Source: [http://EzineArticles.com/?The-Power-of-the-Sun-and-Rain-Against-Wood&id=6691218] The Power of the Sun and Rain Against Wood
Read More..
We know the power of the elements is astounding, but we may not practically realize just how destructive they can be. The sun, rain, high temperatures, low temperatures, and humidity all play a role in gradually wearing a given material down. Obviously, by keeping an object indoors, you can eliminate the rain and greatly reduce the damaging effects of the others as well.
This is why a structure or DIY project of any kind must be treated accordingly if they are to be permanently exposed outdoors. Wood in particular, depending on type, can be very weak to repeated attacks by the sun and rain. But even before it begins actually rotting and decomposing, it will change shape as it absorbs and desorbs moisture - often considerably.
This change-shape occurs due to a localized expansion or contraction of the wood, manifesting itself in various forms of wood-warping. It follows that if the entire piece would expand or contract in a uniform fashion, the board would only change in dimensions but wouldnt skew or warp. However, this particular scenario will never play out in the real world with boards of any substantial volume or length.
But depending on wood type and the direction of grain, the level of warping can be considerably different. Certain types of wood are simply more resistant to moisture and insects, and quarter-sawn boards - due to the direction of the grain - are more resistant to warping. You put these two qualities together and you get yourself some fairly high-grade boards with which to build outdoors.
An old Table Exhibiting Major Shape-change
Heres a first-hand example of what can happen to a piece of furniture that is left out in the sun and rain with absolutely no regard to its well-being. Granted, the table top isnt a solid piece of wood but a composite of smaller wooden segments, making it significantly weaker to the elements. However, although its time has clearly passed, Im sure there was once a day when this table was a stunning piece of furniture in its own right.
On dry, sunny days, the rel=nofollow [http://freeandhandy.com/handmade-homemade-rustic-dining-table/]table top curls up into the shape of a smile when viewed cross-sectionally. Why? Because the direct sunlight literally sucks the moisture out of the top surface of the table top causing it to contract. This contraction is what pulls the wood into the nice - but impractical - shape of a smile. The opposite occurs on a rainy day. The same top surface will expand, causing it to return to its original flat shape.
If you liked my article please visit my website at [http://freeandhandy.com]Free and Handy for more, thanks!
Article Source: [http://EzineArticles.com/?The-Power-of-the-Sun-and-Rain-Against-Wood&id=6691218] The Power of the Sun and Rain Against Wood
Sunday, March 2, 2014
The Veggie Garden
Hey there! Hope everyone is enjoying their day. I thought I would share some photos of our backyard garden with you as that is where we are spending most of our time these days since its SUMMER! Yay!

Gardening is a huge passion of mine. Our kids have even been bitten by the gardening bug. Hubby and I have had a vegetable garden since we first married 20 years ago, no matter where we live.

We kinda follow the square foot gardening plan in that we built 4 x 4 boxes for our vegetables. Thats about it. I dont really plant something per square foot. This works for us. As you can see, we finally finished the privacy fence and oh how we love it. We still have some landscaping to do in the back corner where our compost bin is. All the veggies are coming along nicely, which is a far cry from last summer when everything completely burned up with the hotter than hades summer.

The heirloom tomatoes blooms are setting and I cant wait to eat them. It feels like forever since we have enjoyed tomatoes right out of the garden.

We also planted lots of cherry and yellow pear tomatoes to throw in our salads and pasta. Or add to the basil with fresh mozzarella. Yum!

The zucchini. I have to admit I have a love hate relationship with zucchini. While I love to eat them, I cant seem to grow them very well, even though they are supposed to be fool proof. Anyone else have this problem? Mine shrivel up, turn yellow and die before they ever get big enough to harvest. I read this is because of inadequate pollination. So, I did try the hand pollinating method of taking the male and female flower and..........(ahem) nevermind. Um, have you ever seen what the inside of male zucchini flowers looks like? I have to admit, I may or may not have turned bright red while doing it. It worked last year, but I dont get up early enough when the flowers are open in the morning to do that with each one. So, I might be buying all our zucchini at our local farmers market.

The arugula is growing like weeds. Love that stuff.

And we cant wait for these little flowers to turn into delicious cantaloupe, my boys favorite. Im telling ya, you cant even compare the taste of a garden cantaloupe vs. a store bought.
So sweet and juicy.

Plenty of mint. I like to add sprigs to simple syrup and steep, then remove and toss with fresh fruit. So good.

And all the other herbs are doing quite nicely.

As are the red geraniums. Theres nothing quite as cheerful as a bright red geranium.
We also have planted cucumbers, banana peppers and red bell peppers. All of our plants I started indoors by seed during the winter under grow lights.
So much cheaper, though kinda a lot of work, too.
I just love summer vegetable gardening and highly recommend it,
even if you have to grown your veggies in pots.
Enjoy the rest of your day!
Wednesday, February 19, 2014
The Why of Finishing
I have always been a little intimidated my the finishing process. I know I am not the only shaving slinger who faces this issue. Im sure there are several reasons for this.
Read More..
As Ive said before, Norm Abrahms was my gateway into the woodworking world. Over a decade ago I would watch his show every chance, and while he spent nine tenths of the show going over the details of machining the wood and lovingly placing every biscuit. He would wrap up the finishing in less than five minutes, always telling us what he was using, but never the why.
I had similar experiences in most of the mainstream woodworking media, and even to some extent in books, even books written about finishing. There was a piece that was missing for me in those places. I couldnt put my finger on it, hell I probably still couldnt tell you exactly what that thing is. It doesnt fit well into words, not for me at least. I read about the guys I looked up to using these wonderfully complex finishes but what I couldnt get was why they chose to use them.
What makes a woodworker decide to use a danish oil or a french polish? Whats the best way to finish walnut? Pine? Bulbinga? How do you know when to choose?
I think I may be starting to figure it out, somewhat. And its not something that came from a book, or a blog, or a group of magical elves that appear in my shop at night while I sleep. Well its not completely any of those things anyway, its partially those things and partially something else.
Let me try and explain it like this:
I have a friend who is a bladesmith. A blacksmith who specializes in making swords, daggers, knives, spears, axes, and other general implements of use in dismantling a human body. Ive bought several of Daniels pieces over the years and I love his work. He has an keen eye for subtle lines and grace in historical accuracy. Hes been at it for many years and Ive always considered him very accomplished.
A while back I was visiting with him and he said he was excited because he had finally cracked the secret of correctly tempering steel. I admit I was a little surprised by the admission.
"Havent you been tempering your blades for years?" I asked
"Well, yes," he said, "but not always the right way."
Confused? I still was too.
Daniel went on to explain how the man who got him started in smithing taught him to temper like it reads in the books, but he also told him that this wasnt the best way, or even the right way. He told Daniel hed have to search for that on his own and hed know it when he found it. After several years of experience and experimenting, he finally found it.
Now I dont agree with the concept of intentionally with-holding information, and I know on the surface it can seem like this is what happened in my friends case. But theres something to be said for earning something important. A nugget of knowledge earned is a much more treasured thing. Daniel finally conquered an important thing through perseverance and experience, and along that path he learned tempering in a much more subtle and thorough way. He was given the groundwork and set on his own path to learn something difficult to accurately explain in words and even pictures.
Ratione et Passionis
Oldwolf
Monday, February 17, 2014
Furniture Woodworking Plans Tips to Find the Very Best Furniture Woodworking Plans

Want Great Results? Furniture Woodworking Plans Are Essential
Furniture woodworking plans are essential if you wish to start a DIY wood project. It is necessary because it would guide you through the different steps that you need to take as well as help you visualize what needs to be done and the possible outcome of the project.
Good furniture woodworking plans would provide you with a well paced instruction which includes diagrams, illustrations and even videos that would take you through every step with ease from beginning to completion.
Good Drawings? Where Do You Find Them?
Now, where would you be able to find these furniture woodworking plans? Most people would take advantage of the Internet and look for these drawings online while there are those who are craft enough to come up with their own design.
There are free sources online, however, a lot of these free packages arent complete or dont provide clear instructions which can lead to plenty of trouble along the way for you.
These drawings vary according to the kind of project you wish to start. If you are a beginner who is simply looking for something easy to try your hand at then look for the ones that make use of a basic design.
This should get you better acquainted with how they work and how to approach them. After all, every person has their own technique and starting small should help you develop your own.
Its All In The Details
Hobbyists, woodworkers and professionals alike are always on the look out for furniture woodworking plans that is very easy to use. The thing is that there are people out there who are very interested in working with wood but are not confident about their ability to complete a project.
This is why choosing a good plan is very important. Detailed instructions are imperative when you are choosing a plan to use.
A Smorgasbord of Furniture Woodworking Plans
The more detailed they are, the better for you. This is especially true when it comes to the more difficult projects. A good example of a well thought-out drawing would be those provided by one website that we are aware of.
Besides being one of the most accessible furniture woodworking plans out there, it also provides you with a great selection of project drawings to choose from. Over 14,000 different projects to be exact. Anywhere from storage plans, rabbit house, doors, cradles, decks, dog houses and so on. Theres plenty to choose from, needless to say.
From Novice To Professional - Good Drawings Are A Must
The best thing about these drawings is the fact that even if you dont have any experience when it comes to DIY furniture making, you would still be able to accomplish a project because of its easy to follow instructions.
Besides that, their drawings would be able to help you test your skills and in the long run, develop your own methods based on the schematics that you were provided with.
Of course, adding a bit of your personal signature to a furniture piece is always a good idea and the only way you would be able to do this is through acquainting yourself with how these woodworking plans work.
Monday, February 10, 2014
3 Years On Ive Still Not Found The Ultimate Woodshop
It was three years ago today that I published my first post here, at the Penultimate Woodshop. It was a fairly routine first post. I introduced myself and thanked the online woodworking community.
As I reflect on it, Im now more thankful to the online community than ever. Im thankful for the help, instruction and friendship that Ive received from the community. While woodworking is often a solo activity, I know that sharing it with a community of fellow woodworkers enriches the experience beyond measure.
So please keep woodworking, keep participating and keep sharing. Thank you for reading (you can keep doing that too).
Dyami
com
Read More..
As I reflect on it, Im now more thankful to the online community than ever. Im thankful for the help, instruction and friendship that Ive received from the community. While woodworking is often a solo activity, I know that sharing it with a community of fellow woodworkers enriches the experience beyond measure.
So please keep woodworking, keep participating and keep sharing. Thank you for reading (you can keep doing that too).
Dyami
com
The arched top door Minster Oh The exterior layers
With the core of the door complete, its time to make and apply the exterior layers of the unit. Ive selected some wide white oak, which will give the door a more bold pattern. I am taking my normal route of cutting to general length, planing down, and straightening the edges.
However, I want to go one more step with this. Id like the edges that will be together to be nice and snug. So, here is a way to scribe long boards together. My method is to lay two boards side by side, clamp down a straight edge, and run my circular saw between the edges. This will effectively scribe one board to the other, and give me nice tight joints!
In the last picture, I have glued all boards and clamped everything in place. You cant see it, but the core is underneath the clamped layer of oak. I started with the center board and worked my way to the outsides. I made sure to apply a full spread of Titebond III waterproof glue, on the surface that is in contact with the core and also the edges (I use a 3" wide foam brush to spread the glue - works great - then just throw it away).
After this has dried, I will rough trim the edges close to the core, and then do final shaping with the router and a flush trim bit.


Read More..
However, I want to go one more step with this. Id like the edges that will be together to be nice and snug. So, here is a way to scribe long boards together. My method is to lay two boards side by side, clamp down a straight edge, and run my circular saw between the edges. This will effectively scribe one board to the other, and give me nice tight joints!
In the last picture, I have glued all boards and clamped everything in place. You cant see it, but the core is underneath the clamped layer of oak. I started with the center board and worked my way to the outsides. I made sure to apply a full spread of Titebond III waterproof glue, on the surface that is in contact with the core and also the edges (I use a 3" wide foam brush to spread the glue - works great - then just throw it away).
After this has dried, I will rough trim the edges close to the core, and then do final shaping with the router and a flush trim bit.
Thursday, February 6, 2014
back to work on the kid table
Now that the Hall Tree is done I could start working on the kids table again. I stained it on Saturday to match the Hall Tree since they will be in the same area. The stain came out a little blotchy in some areas. The directions on the stain say that it does not need any conditioner applied first and I had great results with all my tests on the Hall Tree. I bought the wood for the hall tree at Home Depot and the wood for the table was purchased at Lowes. I also sanded the table a couple of weeks ago. Im thinking that I should have re-sanded it the same day to open the pores a little more. I also should have found some scraps from the Lowes wood to test the stain on. I put one coat of poly on the bottom on the tabletop, let it dry for an hour, and then flipped it over and put a coat on the top. I am going to give it a light sanding tonight and then apply another coat on both sides. My goal is to have 2 coats on the bottom of the tabletop and the legs and frame and then 5 coats on the tabletop itself.
On a side note its still pretty neat to see the color pop when you add the poly.


Wednesday, February 5, 2014
The executive desk Monclova Oh Making the top
After 6 hours of sanding, Ive gotten the first top coat of stain on the desk top. A note about sanding - I began with 60 grit, then worked my way through 100 grit and 150 grit. I do not want to go much further than that.
I have one more sheet of maple plywood that was stained up in the beginning of the project, so I am using that as a base sheet below the solid maple top. In these photos, I have cut both to size plus 1/16", and have glued and screwed the base sheet to the top. I have then done a final cut to size, and checked for square (which was perfect).
The next step will be a bull nose edging all the way around. This project is pretty close to being finished - just some small details left to do!


Read More..
I have one more sheet of maple plywood that was stained up in the beginning of the project, so I am using that as a base sheet below the solid maple top. In these photos, I have cut both to size plus 1/16", and have glued and screwed the base sheet to the top. I have then done a final cut to size, and checked for square (which was perfect).
The next step will be a bull nose edging all the way around. This project is pretty close to being finished - just some small details left to do!
Tuesday, February 4, 2014
Under the stairs storage Part I
Here are pics of another project - storage under a set of stairs. Sometimes, the backside of a staircase is open, and this area has alot of possabilities! In the first picture, you can see how I am furring out the walls, and lining them with painted 1/2" mdf. This particular stairway is old, and VERY out of square - in 36" it is 1-5/8" out of square! WOW!!! Ive managed to hide it all behind the horizontal furring strip you can see in the picture. I will trim this out with more mdf, and it will end up looking perfectly normal!
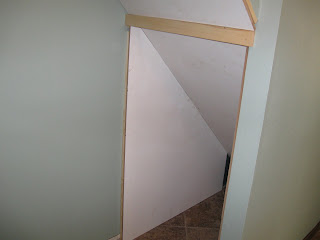
The next two pictures show how wavy the old wall is. From the first view point, it doesnt look too bad. But in the second picture, you can see how Ive had to scribe the mdf to the wave. This is accomplished by using a compass to trace the wall waves onto the mdf, and then cutting along the line (in this case with my circular saw). Once I apply a thin bead of caulk, the wave will literally disappear!


Read More..
The next two pictures show how wavy the old wall is. From the first view point, it doesnt look too bad. But in the second picture, you can see how Ive had to scribe the mdf to the wave. This is accomplished by using a compass to trace the wall waves onto the mdf, and then cutting along the line (in this case with my circular saw). Once I apply a thin bead of caulk, the wave will literally disappear!
Subscribe to:
Comments (Atom)