Showing posts with label part. Show all posts
Showing posts with label part. Show all posts
Wednesday, February 19, 2014
Old World Tool Chest Part 1
I know for a fact that I will not make my goal of blog posts for October, again I apologize for my recent tardiness but I have been missing the shop as well. My family and I have been very busy relocating to a new residence in LaCrosse WI, about 20 miles from the old place. The good news is that the weather has been beautiful here, cool, dry and easy for moving. The bad news is that the weather has been beautiful here, cool, dry, and I havent been able to see the inside of the shop for longer than five minutes for about three weeks now. I guess the best news for me is that the shop is located on neutral territory and was immune to the whole moving process, and I do have a little bit of a back load of photos here to share until I get into the shop again next week.
In a previous post I mentioned that my father-in-law had seen fit to give to me the tool chest that had belonged to his great uncle, his father, and himself. In Norway in the 1800s his great uncle Melvin Indahl had been a carpenter. In 1865 he crossed the pond with his brother to find a good life in America. Eventually they settled in South Dakota and went to work farming. Being a carpenter Melvin ofcourse knew that his tools would be some of the most valuable items at his disposal, so he constructed a tool chest, (I could be embellishing a bit, imagine that, the chest could very well have existed before any decisions to strike west happened) The chest dutifully transported his tools across the ocean and across half of the USA before they paused in South Dakota later to backtrack as my wifes grandfather moved the to Western Wisconsin. The tools inside have changed along the way, some have been lost and replaced with others, some tools have been added, and some broken I am sure.
A few years before my father in law gave me a cardboard box that contained some of the previous contents. Several chisels and gouges, a couple of axe heads and a pair of wooden body jack planes. But to see what else this chest contained still leaves me buzzing with energy. Everything needs a clean up to say the least. Some pieces have a thick layer of rust and may not be usable after I get them cleaned up, but well see.
 And last, but not least, the saws. These blades are old, I am sure that at least on of them pre-dates the Disston Era, perhaps several. Three full sized are filed crosscut, One filed rip, a keyhole saw with a lot of rust and an odd little saw with a home made handle and maybe a home made blade as well... Im just calling this a joinery saw for now. One really neat thing about living where I do is its the same town that Mark Harrell lives in. Is the name familiar, yes hes the owner of Bad Axe Tool Works and the infamous Bad Axe hand saws. Mark does an excellent job of saw restoration and though I have done my own saw restoration in the past, if these saws are as old as I think they are, then I want an experts opinion on what should be done and most likely I think want to have an experts hands "supercharge" these saws for me for another few centuries of performance. I know that hes probably getting busy with Christmas upcoming, I think Ill look him up after the holidays.
Next time...The chest itself.
Cheers
Oldwolf
Read More..
In a previous post I mentioned that my father-in-law had seen fit to give to me the tool chest that had belonged to his great uncle, his father, and himself. In Norway in the 1800s his great uncle Melvin Indahl had been a carpenter. In 1865 he crossed the pond with his brother to find a good life in America. Eventually they settled in South Dakota and went to work farming. Being a carpenter Melvin ofcourse knew that his tools would be some of the most valuable items at his disposal, so he constructed a tool chest, (I could be embellishing a bit, imagine that, the chest could very well have existed before any decisions to strike west happened) The chest dutifully transported his tools across the ocean and across half of the USA before they paused in South Dakota later to backtrack as my wifes grandfather moved the to Western Wisconsin. The tools inside have changed along the way, some have been lost and replaced with others, some tools have been added, and some broken I am sure.
A few years before my father in law gave me a cardboard box that contained some of the previous contents. Several chisels and gouges, a couple of axe heads and a pair of wooden body jack planes. But to see what else this chest contained still leaves me buzzing with energy. Everything needs a clean up to say the least. Some pieces have a thick layer of rust and may not be usable after I get them cleaned up, but well see.
 |
| So many tools they could not all fit on the workbench. The saws had to rest out on the lid for their pictures. |
 |
| Starting on the right end of the bench. A large 24"drawknife, a couple of slicks, one with a very short handle, a wedge and a couple of large thread cutters. The mallets in the background have been in the shop a long time, they were not part of the chest. |
 |
| Moving towards the left, a fine wooden level, a couple of dividers, a trisquare, a variety of files, a saw set and a couple more wedges. One item I am having trouble identifying is the circular "pizza cutter" looking item on the left, the blade does not rotate it is pinned static. |
 |
| A little more left we go, and here we can see a couple of hammers, one sans handle, some multi wrenches a stone dressing tool and a couple of the nicest woodwrights rasps I have ever seen, I really hope I can get them cleaned up and usable again. |
 |
| A variety of brad awls, a stone wheel, and various small pieces of metal and bolts, a blacksmiths tongs and a couple of files forged into scrapers and what I think was probably a hoof knife, both for farrier work. Theres a miniature, maybe a practice, horse shoe, a slew of steel cutting chisels that have almost all been neat to hell, and a whole bunch of brace bits. |
 |
| A couple of spoon bits, something I have been looking for for a long time, With my second hobby as Viking age rennactment, spoon augers have been found in archeological finds, so spoon bits are a big part of making me more authentic in my portrayal of a a woodworker from the medieval era. |
Next time...The chest itself.
Cheers
Oldwolf

Monday, February 10, 2014
That Giant Sucking Crushing Sound Part II
Once my metal chip bin met with crushing failure, I immediately scrapped it and set about re-building the dust collection bin. I first looked into buying a metal 55 gallon drum, but found them to be prohibitively expensive. I then found a plastic 55 gallon drum that had seen better days and was suffering from a cracked edge. As the bin was plastic I was able to simply cut off the cracked top section with my jig saw. After the cut I was left with a workable +/- 48 gallon drum with a gaping hole at its top.
In order to mount the Dust Deputy to the plastic drum I initially thought of making a round lid out of MDF that would rest on the top of the drum and be sealed with weather stripping. In order to do this, I began flattening the cut edge of the drum. I then flattened it some more, and some more after that. Then I ran out of patience. It dawned on me that if I made a new top for the drum out of sheet goods, I could permanently mount and seal that to the drum and then cut a removable top sized to perfectly fit the mounted one. In order to make the mounted and removable tops exactly the same size I screwed them together and then cut them to size on the table saw as a single piece. Being lazy, I made the top square, rather then cut of the corners to make it a space savings octagon. I attached a lip of 3/4" baltic birch plywood scraps around the edge of the removable top to better gasket them and chamfered the inside edge of the lip to make tops easier to set on one another.
In order to mount the mounted top I glued and screwed cleats to the top. I used a jig saw to cut the middle of the mounted to out and then screwed the plastic drum to the cleats. I sealed the screws and the drum to the mounted top with M-1, a fantastic sealant we use at work.
I was at this stage in the construction when I heard that MDF was porous and might not provide an air tight top. To combat this, I sealed the top surface of the mounted top and the bottom surface of the removable top with shellac. If this doesnt prove to be enough Ill glue an EPDM gasket to the mounted top.
With the top mounted and air sealed (hopefully) it was quick work to install the Dust Deputy and previously built elbow assembly. I connected the CT22 and turned the knob all the way to the rabbit. It sucked and sucked and didnt crush.
As a final convenience I mounted castors to the bottom and handles on the side of the plastic drum. This lets me easily move it around the shop and will hopefully let me easily empty it (though I fear its emptying frequency will be based more on weight than on capacity).
Now my shop sucks with the best of them. How does your shop suck?
That Giant Sucking (& Crushing) Sound - Part I
Read More..
 |
| rough fitting the mounted top section. |
 |
| I rubbed in and let the glue on the cleats on the mounted base dry before flipping the unit over and screwing into them. |
 |
| The mounted top, sealed to the plastic drum. |
 |
| The completed Dust Deputy setup. |
 |
| The wheels make it so much easier to move. |
Now my shop sucks with the best of them. How does your shop suck?
That Giant Sucking (& Crushing) Sound - Part I
Thursday, February 6, 2014
Saw Storage Upgrade Part II
I gave some thought to making another till for my bench saws, or maybe some kind of cabinet, but in the end I decided to stick with the hanging panel idea. One thing I really like about tool holding panels is how easy it is to see and get at everything. Plus, I like how it looks; a kind of "shop art".
The new panel would hang from the French cleat system I use in my shop. Basically, this works by having two boards, each with 45° angles, that interlock. One board is attached to the wall, and the other is attached to the back of whatever you are hanging. In my shop, I have a continuous cleat running along the walls. This makes it very easy to hang and rearrange all sorts of things: panels, tills, shelving units, miter boxes, postdrills etc.
One thing that needs to be addressed is how to attach the corresponding cleat to the unit being hung. Most things hung in my shop simply have the cleat glued and screwed to the back of the frame at the top. This is long grain to long grain, and therefore wood movement is not an issue. Sometimes the cleat must be attached cross grain, and here wood movement could be a problem. On relatively narrow cross grain joints, such as the single 1x12 panel that holds my braces, I dont worry too much about it. I just screw it on and only glue it in the middle. Larger cross grain joints, such as the one on this new saw panel, are a different story.
To get the width I wanted for the new panel, it would be made from three 1x10 boards. If I used glued butt joints to join the boards into a single 27 inch wide slab, movement could become fairly significant. If I then just screwed the cleat across the back, the board would most likely split as it tried to move. I could have used slotted holes for the screws, but instead I decided to just use unglued T&G (tongue & groove) joints and attach each board to the cleat separately. This way, each board is free to expand and contract independently, while the T&G joints keep everything aligned and looking good - i.e. no wall visible through gaps between the boards.
The first step was to joint the edges so that they would be nice and straight. This picture might be a little confusing. I jointed the boards on edge, and then lay them flat to see how they fit. I wasnt using the #8 jointer to plane the faces (although I could have if I wanted to - "Breaking the law! Breaking the law!").

To make the T&G joints I used my Stanley #49. It has an eccentric swinging fence that allows it to cut both the tongue and the groove. Originally, it would have come with an extra wide iron for use on thicker boards. This would allow it to remove all the wood to the right of the tongue. I dont have that, so the extra "tongue" will have to be removed next. I wanted the tongue offset to the backside of the board thickness to allow room for forming a bead along the edge.

To remove the leftover wood, I used my small rabbet plane. I set it for a thicker shaving to speed things up.

Then it was time to make the side beads:

After that, I cleaned up the show faces with my #3 smoother. Its amazing how much better the wood looks after the scalloped machine planing marks are removed.

As a side note, it was while using those last four planes that I shot the images for the Planes and Shavings post.
This next sequence shows how I make my French cleats. Its funny, but I remember how much of a challenge this was the first time I had to do this after getting rid of all my power tools. I just didnt have my "hand tool brain" going strong yet. Really, its quite simple and rather easy.
First, with a marking gauge set to the thickness of the board, I scribed a line down one face of the board. I also put pencil marks across the top to make it easier to see the bevel as it develops.

Then I remove the bulk of the waste with a drawknife. You could also do this with a scrub plane, or even a jack plane; but they would both be slower than the drawknife.

Finally, I cleaned things up with a jack plane. The secret is to keep the bevel developing evenly as you go. Its not hard once you get the knack, and you could do any bevel angle you want the same way.

After the bevel was complete, I attached the cleat to the top rear of the panel. I chose to use finish screws near the center of each board. I used a 1/4 inch forstner bit in my hand drill to create the counterbore (which I later plugged).

After boring pilot holes with another hand drill I drove the screws with a 6" swing brace. I love using these small braces for driving screws. They provide plenty of torque, are the original "variable speed" driver, and have a great sense of feedback that beats any cordless drills clutch feature. The smaller size allows for quicker driving.
One problem I ran into was sinking the screws too deep for the driver bit to reach. I had to get creative. In the end, I filed off the tang on a triangular file until it matched the square driver hole in the screws, and then used a pair of Vise-Grips as a 90° handle. Worked great.

And heres the new panel in place; looking spiffy - but empty:

I spent the next few weeks making various holders for the saws. Nothing tricky, just a lot of finicky work getting the fit just right.

And heres the panel with the saws:

I quite like it - makes me happy every time I look at it. Im also happy to be finished. It took a lot longer than I was planning.
Well, its mostly finished anyway. I saved one spot next to the Lie-Nielsen dovetail saw for an old Disston dovetail saw I am going to finish fixing at some point. I started working on it over a year ago, but it turned into a disaster of saw plate flattening: "Just one more tap of the hammer... tap... hmm... maybe... tap... No!... Arrgh!" Its hopeless, and Ill need to completely replace the saw plate - later.
Tuesday, February 4, 2014
Under the stairs storage Part I
Here are pics of another project - storage under a set of stairs. Sometimes, the backside of a staircase is open, and this area has alot of possabilities! In the first picture, you can see how I am furring out the walls, and lining them with painted 1/2" mdf. This particular stairway is old, and VERY out of square - in 36" it is 1-5/8" out of square! WOW!!! Ive managed to hide it all behind the horizontal furring strip you can see in the picture. I will trim this out with more mdf, and it will end up looking perfectly normal!
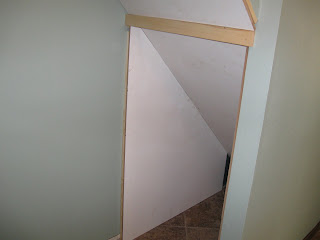
The next two pictures show how wavy the old wall is. From the first view point, it doesnt look too bad. But in the second picture, you can see how Ive had to scribe the mdf to the wave. This is accomplished by using a compass to trace the wall waves onto the mdf, and then cutting along the line (in this case with my circular saw). Once I apply a thin bead of caulk, the wave will literally disappear!


Read More..
The next two pictures show how wavy the old wall is. From the first view point, it doesnt look too bad. But in the second picture, you can see how Ive had to scribe the mdf to the wave. This is accomplished by using a compass to trace the wall waves onto the mdf, and then cutting along the line (in this case with my circular saw). Once I apply a thin bead of caulk, the wave will literally disappear!
Subscribe to:
Posts (Atom)