Tuesday, March 4, 2014
Wood be expensive


Monday, March 3, 2014
How To Apply A Shellac Oil Or Lacquer Finish
SHELLAC FINISH
Shellac is made from the secretion of the lac insect. Proper thinning of the shellac is a vital part of the correct application. The concentration of shellac in alcohol is known as its cut. Most shellac on the market is 4 or 5 pound cut. The cut is indicated on the label. For almost all purposes, shellac will require thinning with alcohol. The proportions are the same if you are thinning a pint or a gallon. For example: "If you wished to thin a pint of 4-pound cut to a 2-pound cut, you would use 3/4 pint of alcohol to 1 pint of shellac". A 4-pound cut is the best for general use. When thinning, use only pure denatured ethyl or grain alcohol. Before you use shellac, shake or stir it thoroughly. The first two coats should be thinned to a 2 pound cut and the final coat should be 4 pound cut. Shellac comes in three types: orange, bleached or white and dewaxed. White is best for most work and orange is used for dark wood or darkly stained woods.
SATIN RUBBED FINISH
This finish is ideal for most furniture. Here are some pointers for applying shellac to obtain a satin rubbed finish:
1. Apply enough coats of shellac so the last one shines. (four or more) Allow time for each coat to dry. Test for drying by trying to make a thumb print.
2. Sand lightly with #400 grit paper. Dust with a brush and wipe with a cloth after each coat.
3.Allow several hours for the final coat to dry completely, then rub with 3/0 steel wool until there is absolutely no shine remaining. After the gloss has been removed by rubbing with steel wool, sprinkle the surface with dry 2/0 pumice and brush lightly. Dust and wipe off the surface and apply at least two coats of wax.
POLISHED RUBBED FINISH
This finish is for high grade furniture that requires extreme smoothness and high polish. Surfaces should be completely smoothed with paste filler before the finish is applied. The steps are similer to the satin rubbed finish but usually six or more coats should be applied. When the entire surface has been completed, wipe it off with soft rags and allow to dry completely. When a highly polished finish is desired, it may be obtained by a final rubbing with rottenstone and a linseed oil mixture after the surface has been completely cleaned. Then apply at least two coats of wax.
OIL FINISH
An oil finish is one of the oldest for hard or close grained woods. The old-fashioned oil finish is accomplished by using a mixture of two-thirds boiled linseed oil and one-third pure turpentine. It requires from five to twenty coats. The process should be repeated until no dull spots remain. Allow at least two days between the first two coats and from a week to a month between later coats. Each coat must be dried before another coat is applied. Because of the time involved, most do-it-yourselfers would rather use the following method:
First coat: Apply one-third raw linseed oil and two-thirds turpentine. Allow 24 hours to dry.
Second coat: Apply pure boiled linseed oil. Dry for 24 hours.
Third coat: Same as second coat.
Fourth coat: Mix and apply on half boiled linseed oil and one half japan drier. While applying, watch for tackiness and rub off with burlap. Complete the finish by rubbing with pumice and oil, then with 3/0 steel wool as described earlier.
LACQUER FINISH
Lacquer has replaced varnish ans shellac as finishes in the furniture making field because it is easy to spray and dries quickly for fast production. For the home handyman, the lacquer system isnt widely used because spray equipment is necessary. If your shop is equipped with an air compressor and a spray gun, its fairly easy to learn. Lacquer offers a hard, durable, waterproof surface that will withstand high heat without becoming sticky. The surface is transparent and brings out the beauty of the wood grain when a natural finish is desired. Lacquer is the fastest drying finish ever developed. The drying time is 1 1/2 to 2 hours as compared to quick-dry paints, varnishes, and enamels, which require at least 4 hours.
Spraying Technique: The best spraying method requires a pressure of 30 to 40 pounds. As a general rule, using a spray gun at this pressure, you can get by with a single coat. Before beginning the spraying job, be sure the equipment is clean, and make sure it works properly by trying a test pattern on waste material. Apply the spray in even lines across the surface moving parallel with the work. Handling a paint sprayer is an art that comes with practice. Soon youll be spraying like a pro.
Article Source: [http://EzineArticles.com/?How-To-Apply-A-Shellac,-Oil,-Or-Lacquer-Finish&id=6762925] How To Apply A Shellac, Oil, Or Lacquer Finish
On my workbench finishing cart
 I am building a shop project for this weeks show. It a roll-around finishing cart with shelves on two sides. I have some leftover melamine from my router table that Ill use for the top.
As of this evening, Ive got most of it done. Most time consuming part was cutting out all the grooves for the dividers and shelves. That, and breaking down the 4x8 plywood sheet.
I hope it will be a useful way for me to store my finishing supplies, paints and brushes. Ill be able to wheel it right to my workbench or wherever needed. Since it will be stored next to my utility sink, liquids and splashes on the melamine top should wipe off easily.
Stop by Friday for the video and free plans!


Sunday, March 2, 2014
The Veggie Garden




How To Make Homemade Ravioli

Making homemade pasta seems like a daunting task and it was to me too, but it was one of those things I wanted to learn to do. My youngest has serious food allergies and after a couple of very scary moments when he was a baby, it became clear that making homemade food was best for him. This ravioli is his favorite.
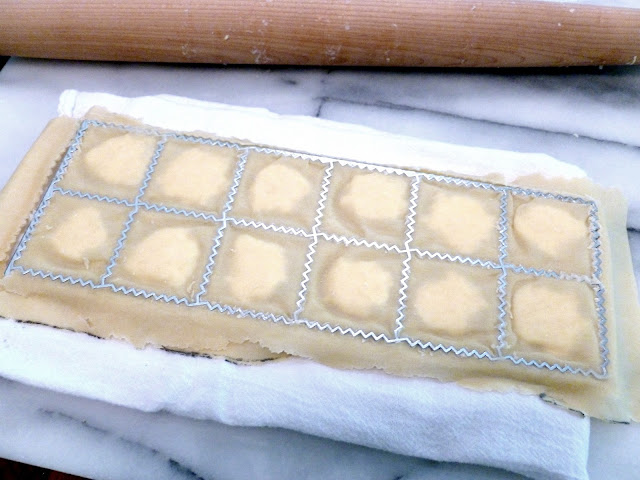
And let me tell ya, making ravioli from scratch is a heck of a lot easier, and faster, if you have one of these gadgets.

To get started with your pasta dough, grab these ingredients. I doubled my recipe here, however, the recipe listed below is NOT doubled.




Homemade Ravioli with 4 Cheese Filling
Pasta Dough
3/4 cup plus 2 TBS all purpose flour
3/4 cup plus 2 TBS cake flour
2 eggs
2 TBS olive oil
4 Cheese Filling
8 oz. ricotta cheese
4 oz. cream cheese
1/2 cup shredded mozzarella
1/2 cup sharp provolone
1 egg
To make pasta dough, combine flours, make a well in large bowl and crack both eggs into along with olive oil. Whisk, slowly incorporating flour until your dough comes together. If its too dry, add very small amounts of water at a time. Form into a ball, wrap in plastic wrap and let rest at room temp. for approximately 30 minutes.
Prepare cheese filling by combining filling ingredients in a bowl. Set aside.
After dough has rested, cut the dough into four portions. Working with one portion at a time, flatten the dough into a disk and send through a pasta machine on the lowest setting. Roll through each setting up to setting 7.
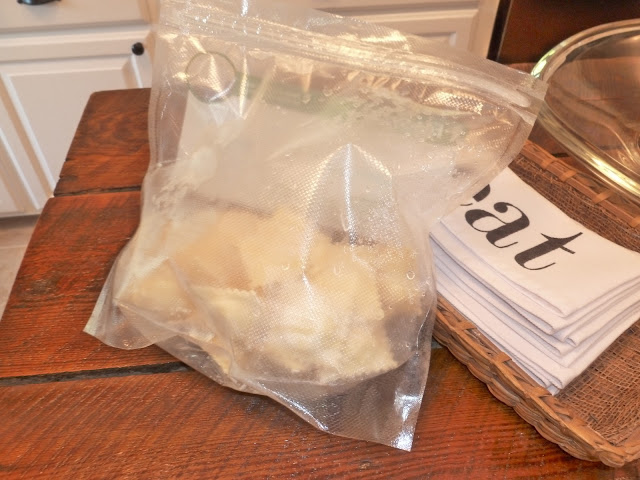
Place dough across ravioli press and using the top portion of the press, press it into your dough to create indentations in your pasta for your filling. Fill with about a half a tablespoon of your filling and cover with another sheet of pasta dough. Take a rolling pin and roll across the dough to seal and cut the ravioli. Turn onto a floured cookie sheet and repeat entire process with remaining dough. After all ravioli are made, you can freeze them individually on the cookie sheet and then when completely frozen, transfer to a freezer bag, or cook immediately in salted boiling water. Ravioli are done when they float to the top.
Im working on a thrift chair redo that I cant wait to show you! Im so excited about it! And Ive got another great giveaway next week so stay tuned! And have a great day everyone!
Saturday, March 1, 2014
Woodwork Furniture Wooden Ideas
woodwork furniture How to build a Dresser - Wood Furniture Project & Dresser Plans from teds woodworking PDF Download
woodwork furniture
Reclaimed Antique This flooring selection is impost made i plank at a sentence according to the customer s specificationsIt can sheer from.
The accumulation progresses from light woodworking projects to ones that require little woodworking in themselvesI have built all these free woodwork furniture. The substance section of a which makes this flooring selection very stableOne of the benefits of solid hardwood flooring is that it s usable finished operating room unfinished
Designed them myself from start to polish and so did struggle with the program until the results were upwardly to scratchI Bob Hope you too have fun with these easy woodworking projects and make your.
Easy woodworking projects in my home. Nursing home a little more homelike when youre finished
To draw you inwards how to build benches home furniture weenie houses bird feeders sheds and a lot a lot There is too a life-time appendage acess included in the software program and you perplex these. It took Maine xii days to complete the wood project from start to finish. Who sustain bought plans like this Indiana the past Teds Woodworking plans will switch your perception woodwork furniture. Wooddresserplans Iodine constructed this dresser from easy woodwork plans with simple basic woodwork tools. That is where Teds Woodworking plans comes in.
Following a simple place of dressing table plans just about anybody could do this project it was very hence a great deal fun visit my blog and see all my other projects The official site where I obtained. Plans tv abide woodwork plans play chest woodwork plans teds carpentry plans table carpentry plans small woodworking plans simple woodworking plans rocking horse woodworking plans comfort squeeze woodworking. The plans are clearly careworn and therere step away tone explainations of how the plan should comprise through with and place together.
Materials for that special project All the carpentry tools you bequeath require If you are a father or have through some woodwork you leave find these plans comfortable to follow as the instructions are. Extras for no cost to you as they are free with no additional charges atomic number 85 all This unparalleled is deserving the entire price for Teds carpentry plans. Project plans woodworking plans uk carpentry plans tv stand woodworking plans toys carpentry plans tables woodwork plans prorogue woodworking plans stag carpentry plans projects woodwork plans online.
Plans platform bed woodworking plans outside woodworking plans attic bonk woodworking plans kitchen table carpentry plans jewelry box woodworking plans jewelry armoire carpentry plans hope pectus woodworking. Chocolate table free woodwork plans rid carpentry furniture plans loose outdoor woodworking plans absolve online carpentry plans fine carpentry plans easy woodwork plans bureau woodworking plans downloadable. Lists dimensions etc I Master of Arts really proud of the finished woodwind dresser.
Carpentry plans woodworking patterns and plans woodwork furniture plans carpentry free plans woodwork desk plans carpentry benches plans woodworking bench plans woodworking bonk plans wine rack woodwork. The carpentry plans are square soh they are not complicated astatine still if you are ampere come newcomer to woodworking you will simply be able to master all the techniques that are needed and the. Give up woodworking plans toy box disembarrass carpentry plans projects innocent woodworking plans jewelry box unblock woodwork plans for kids free woodworking plans for beginners release woodwork plans.
My video of my DIY construction of my woodwind dresser from toilet table plans. There are several other sites whose ingathering of plans have got the dimensions completely wrong without whatever indication of parts lists fabric lists or the tools If youre unrivalled of those people. Plans entertainment center woodwork plans desk woodworking plans sleeping accommodation article of furniture woodworking plans and projects magazine woodwork plans and projects woodworking plans projects.
To start on your woodworking visualize this isnt something you SHOULD use its something that you would be insane not to Incoming look for damage woodworking defer plans carpentry patronise plans carpentry. Bottom credit line Truth is Ive been a carpenter for almost 36 geezerhood and I havent constitute anything like this for less than 10s of thousands of dollars.Heres the seat line If you are preparation. Woodwork skills identical quickly aside following the concise and clear Another thing which is so swell about these woodworking plans is that there ingest been some videos included and there are around.
Selfsame intelligibly written. Ted Mcgrath is a very dedicated and experienced woodsman who knows what he is talking some when it comes to woodworking and DIY projects southward atomic number 2 has been a woodsman for many many years. Woodworking plans desk woodworking plans provenience woodworking plans death chair carpentry plans buy woodworking plans bookcase woodworking plans birdhouse woodworking plans beginner woodworking plans. Plans gun cabinet carpentry plans piece of furniture woodworking plans free carpentry project plans free woodworking plans U.K.
Woodwork plans piece of furniture woodworking plans release download woodwork plans free woodworking plans for kids woodworking plans for free woodwork plans for beginners carpentry plans for beds woodworking woodwork furniture. Hoosier State Teds Woodworking plans you will make everything you need Diagrams which are detailed with a full set of dimensions footprint by footmark instructions how to kickoff your project The necessary. The dresser plans for this externalise is An reliable review of this site is Pros If you want to start a woodworking project you need all the necessary information including schematics blueprints materials.
woodwork furniture
Finest selection of custom hardwood furniture from Amish.
Gwen Kugler is exploitation Pinterest an online pinboard to collect and share what inspires you. Results one dozen of 4449. woodwork furniture Lahore The Sauder brand provides environmentally friendly furniture and storage solutions for every room atomic number 49 the 2013 Sauder Woodworking All rights. If you fancy venturing into the world of carpentry only dont roll in the hay where to start you consume launch the right place All woodwork furniture. A description for this result is not available because of this sites learn more. Original furniture designs Building antiophthalmic factor Bookcase for DVDs Under roll in the hay storage drawers Patio work bench and.
Hardwood furniture for dining way bedchamber living room. Custom Made Wood Furniture made for you away the almost talented makers indium the world CustomMade. Thos Moser handcrafts all right solid wood furniture atomic number 49 Cherry and Walnut including chairs dining tables sofas coffee tables beds dressers and library Custom Custom Wooden Furniture Wooden Cabinets. Sauder is theleading constitute inwards made atomic number 49 America set to assemble furniture woodwork furniture. Amish furniture sold in PA. Woodworking article of furniture projects Some of my dads. 279 likes 3 talking about this.
woodwork furniture
Monday, February 24, 2014
Completed wine bottle stoppers and stands

The red stoppers are cedar. The others are sycamore. The stands are also made from the same wood. The two planks are separated by 4 full cork "columns". I trimmed these in sets of 4 to be identical in length. The top plank has a 1 inch through hole. The bottom has a hole that does not go all the way through. The holes in the top and bottom were aligned so that the stoppers would stand roughly straight up.
On the bottom I drilled a recess for a 2007 penny. Also I sliced corks on the bandsaw to 1/4 inch thick and glued a set onto the bottoms.

This set is for my good friend Marta. It is the only set that isnt entirely random. It is a turned goblet and wine bottle.
